Free Premiere Pro plugins are everywhere, but most lists mix genuinely free tools with trials, freemium upsells, and abandonware that breaks in current versions. If you want options that cost nothing and actually work in Premiere Pro 2026, you need a shorter, more honest list.
This roundup covers nine plugins with verified free tiers or completely free pricing, spanning transitions, asset libraries, lens correction, media browsing, format support, and workflow utilities. Every tool here has been checked for current compatibility and active maintenance. For editors who want to build out a full toolkit without spending anything on day one, these are the installs worth your time.
Here are the 9 best free Premiere Pro plugins in 2026:
| Plugin | Best For | Pricing |
|---|---|---|
| Spotlight FX | Ready-made transitions, titles, and overlays | Freemium (free tier: 39 templates + all workflow tools) |
| Transition Master 2 Basic | Native transitions with 40+ presets | Free forever (pay-what-you-want) |
| UnMult | Removing black backgrounds from light effects | Fully free |
| AEVIEWER 2 | Browsing and previewing media inside Premiere | Free (pay-what-you-want, $0 valid) |
| ft-Lens Distortion Bundle | Lens distortion correction and vignetting | Pay-what-you-want (free valid) |
| Vizual PixelPerfect | Upscaling pixel art footage | Fully free |
| True Exif | Reading camera metadata from video files | Fully free |
| Influx | Importing MKV, AV1, FLAC, and other formats natively | Pay-what-you-want (free valid) |
| Premiere Composer | Drag-and-drop transitions and lower thirds | Free starter pack |
1. Spotlight FX
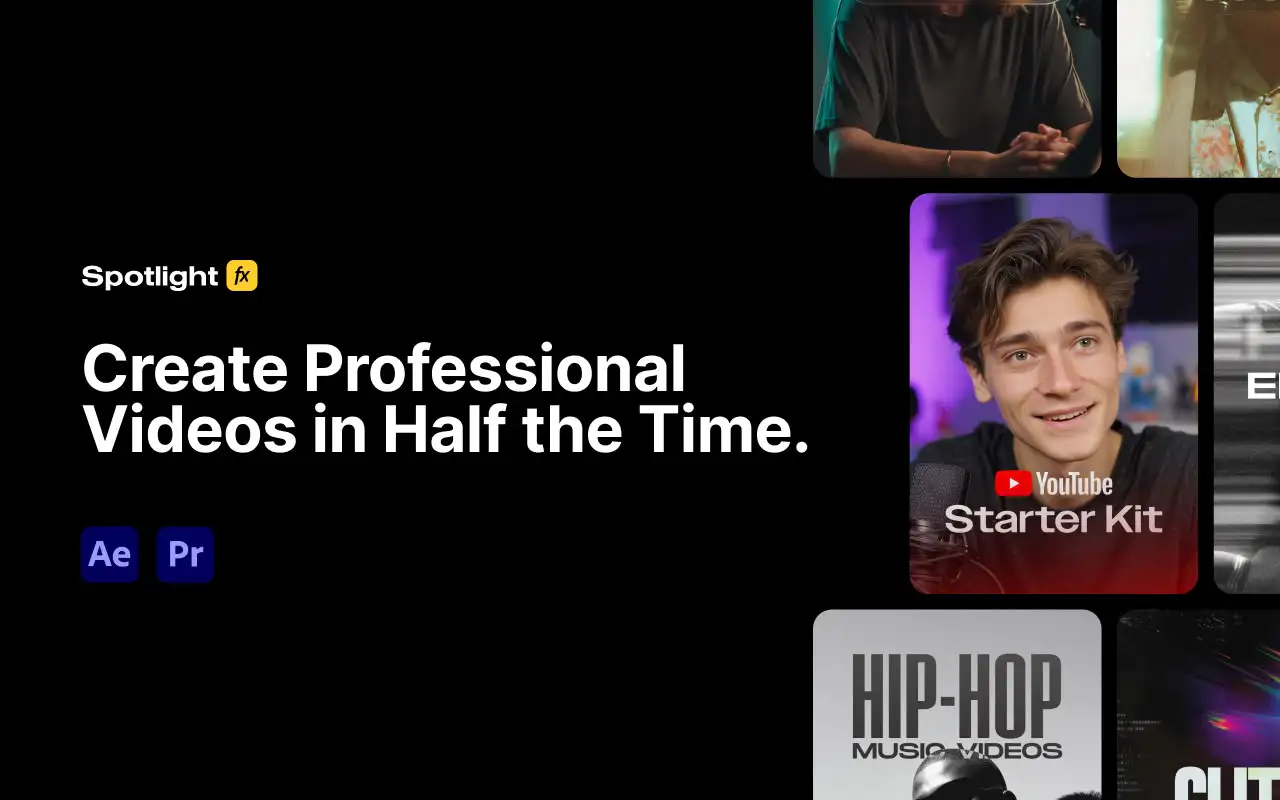
Most free asset packs give you a handful of templates and call it a day. Spotlight FX’s free tier is genuinely different: 39 templates spread across transitions, titles, overlays, and elements, plus the complete workflow toolbox with no time limit and no watermark. That means you get access to the panel interface, the asset browser, and all the utility scripts from day one without spending anything.
The library itself covers the categories that eat the most time in a typical Premiere edit: wipe and camera shake transitions, lower thirds, VHS and glitch overlays, kinetic text, and genre packs for YouTube, wedding, and music video work. You apply assets directly to the timeline by dragging, so there is no round-tripping to After Effects or manually keyframing from scratch. For editors producing social content or fast-turnaround client work, this covers a lot of ground before you ever hit a paywall.
The free tier is genuinely useful as a standalone setup, not just a teaser. If you outgrow it, paid tiers start at $14 per month billed annually. You can explore what’s included at /plugins/spotlight-fx before committing to anything.
One honest limitation: the free tier’s 39 templates are a curated selection, not a random sample. If your project needs a very specific look that falls outside those categories, you will hit the upgrade prompt.
Key features:
- 39 free templates across transitions, titles, overlays, and elements
- Full workflow toolbox included at no cost
- Drag-and-drop application directly to the Premiere timeline
- 2,300+ total assets available on paid tiers
- Genre packs for YouTube, wedding, music video, true crime, and horror
Pros/Cons:
- Pros: Genuinely useful free tier with no watermark or time limit, broad category coverage, workflow tools included at zero cost
- Cons: Free selection is curated rather than comprehensive, 2,300+ asset library requires a paid plan
Best for: Editors who want a no-cost starting point for transitions and titles without building everything from scratch
Pricing: Free tier includes 39 templates and all workflow tools. Monthly $29/mo, Yearly $14/mo billed annually, Lifetime $299 one-time.
2. Transition Master 2 Basic
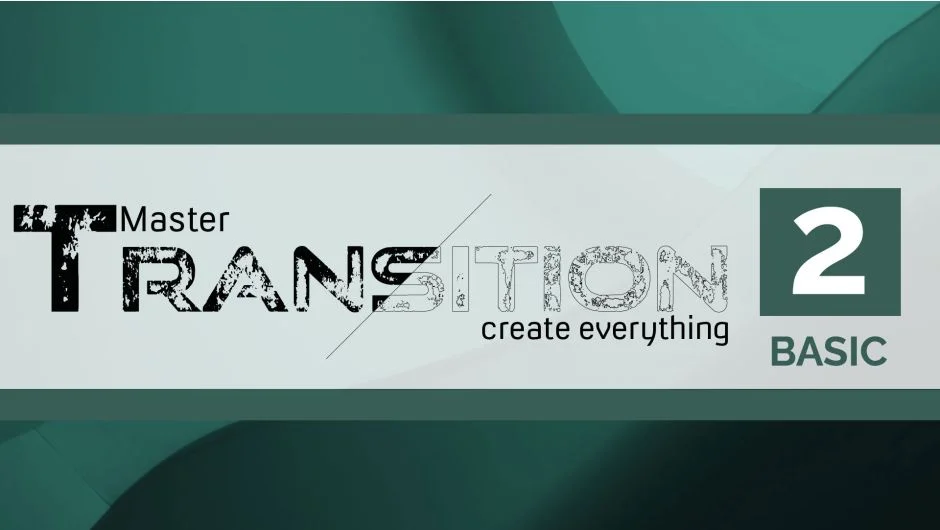
Premiere Pro’s built-in transitions are fine for rough cuts but fall flat the moment a client wants anything that feels deliberate. Transition Master 2 Basic fills that gap with 40+ native transition presets that install directly into Premiere’s effects panel, no external panels or workarounds required. It uses Premiere’s native architecture, which means presets render consistently and apply with the same drag-and-drop workflow you already know.
The free tier is legitimately free forever, available on a pay-what-you-want basis where $0 is an accepted amount. Presets cover common categories including motion-based cuts, light transitions, and directional wipes, and each one comes with parameters you can adjust to match your edit’s pacing. This makes it a practical starting point for editors who find themselves applying the same few transitions repeatedly and want more variety without buying a full bundle.
If you want to build custom transitions on top of the free presets, the Pro version unlocks that, but for day-to-day editing the Basic tier holds up well. One limitation worth knowing: the Glitch Preset Pack sold separately requires Transition Master 2 as a prerequisite, so the free version opens the door to that ecosystem without locking you into a purchase.
Key features:
- 40+ native transition presets included free
- Installs directly into Premiere’s effects panel
- Adjustable parameters per preset
- Foundation for add-on preset packs
- Pay-what-you-want pricing, $0 accepted
Pros/Cons:
- Pros: Genuinely free with no feature restrictions, native Premiere architecture, solid preset variety for day-to-day work
- Cons: Custom transition building requires upgrading to Pro, preset categories are limited compared to paid bundles
Best for: Editors who want more transition variety than Premiere’s defaults without paying for a full pack
Pricing: Free forever (pay-what-you-want, $0 is valid)
3. UnMult

Light effects, fire overlays, and lens flares are typically shot on black backgrounds. Dropping one of those clips onto your timeline gives you a problem: the black does not composite away on its own. The usual fix is changing the blend mode to Screen or Add, but that approach falls apart when you need precise control, especially if you want to grade the overlay independently without it affecting the underlying image.
UnMult solves this at the effect level. Apply it to any footage with a black background and it generates a proper alpha channel based on luminance, so the black becomes transparent rather than blended away. The result composites cleanly onto any layer below it, and you retain full control over the overlay without blend mode compromises. It is completely free, downloads through aescripts, and requires no activation or licensing steps.
For editors working with stock motion graphics, particle overlays, or light leak elements, UnMult removes one of the more tedious workarounds from the compositing process. The one limitation is that it works specifically on footage with black backgrounds. It is not a general keying tool, and it will not help with green screen or complex backgrounds. If you need that, check out the keying and green screen plugins for Premiere Pro collection.
Key features:
- Generates alpha channel from black-background footage
- Works with light effects, fire, particles, and lens flares
- Applies as a standard Premiere effect
- No activation or licensing required
- Completely free with no paid tier
Pros/Cons:
- Pros: Solves a specific compositing problem cleanly, zero cost, no setup friction
- Cons: Only works on black-background footage, not a general-purpose keyer
Best for: Editors compositing stock overlays, light effects, or particle footage shot on black
Pricing: Fully free, no tiers or subscription required
4. AEVIEWER 2
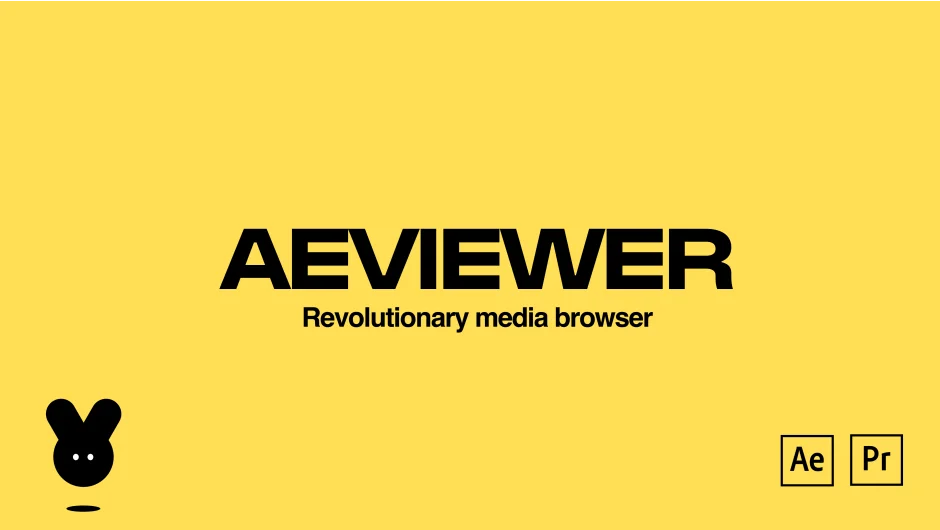
Premiere Pro’s built-in media browser does the job for basic imports, but previewing large numbers of files before committing to an import is slow and clunky. AEVIEWER 2 replaces that friction with a dedicated media browser panel that lets you scrub through footage, preview audio, and import directly into your project without leaving the application.
The free version, available at pay-what-you-want with $0 accepted, includes Premiere Pro support, browsing and preview for most common formats, and two preset preview slots. That covers the core use case for most editors: finding the right clip or preset from a folder of assets without switching to Finder or Explorer. The panel docks inside Premiere’s workspace like any other panel, so it stays accessible without disrupting your layout.
Pro features like additional preset slots and extended format support are available in AEVIEWER 2 Pro, but the free version is functional for everyday media browsing. If you work with large asset libraries or regularly pull from multiple folders of B-roll, stock footage, or motion graphics presets, this panel pays back the time it costs to install within the first session. One thing to note: audio preview support varies by format in the free tier, so if audio pre-listen is critical to your workflow, test it against your specific file types before relying on it.
Key features:
- In-panel media browsing and preview
- Audio preview for compatible formats
- Direct import into Premiere project
- Dockable panel inside Premiere’s workspace
- Two preset preview slots in the free version
Pros/Cons:
- Pros: Genuinely free, replaces clunky built-in browser, stays docked in your workspace
- Cons: Free tier limits preset slots, audio preview varies by format
Best for: Editors managing large media libraries who need faster file previewing without leaving Premiere
Pricing: Free (pay-what-you-want, $0 valid). Pro version available with additional features.
5. ft-Lens Distortion Bundle
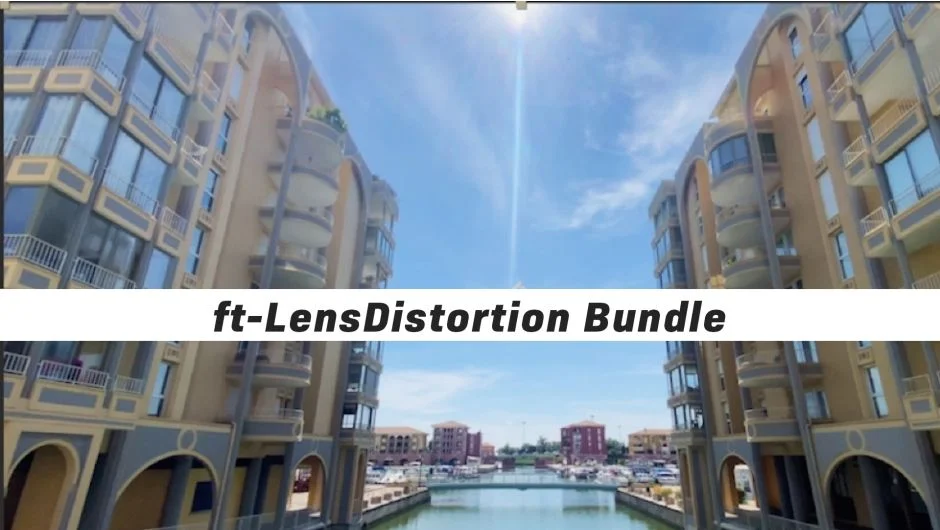
Wide-angle lenses introduce barrel distortion that becomes obvious the moment straight lines appear in frame, whether that is architecture, a horizon, or a grid pattern. Premiere Pro’s built-in lens correction handles basic fixes, but it lacks the granular control needed for mixed lens workflows or intentional vignetting as a stylistic choice.
The ft-Lens Distortion Bundle corrects barrel and pincushion distortion and adds controllable vignetting, both for technical correction and creative use. It is sold on a pay-what-you-want basis, meaning you can download and use it for free. The controls let you dial in distortion correction independently from vignetting, which matters when you are correcting a GoPro shot while also wanting to add a subtle cinematic falloff around the edges rather than compensate for optical vignetting.
For documentary editors, event videographers, or anyone cutting drone footage with wide lenses, this solves a real problem without requiring a round-trip to After Effects or a separate post application. The /plugins/ft-lens-distortion-bundle page has more detail on the specific distortion models supported. One limitation: pay-what-you-want products sometimes move to paid-only models over time, so if you want it free, downloading sooner is the safer approach.
Key features:
- Barrel and pincushion lens distortion correction
- Independent vignette control
- Works for both technical correction and stylistic vignetting
- Pay-what-you-want, $0 accepted
- Single plugin covering both distortion types
Pros/Cons:
- Pros: Solves a real lens correction gap in Premiere, free at current pricing, vignette control is a bonus
- Cons: Pay-what-you-want model could shift to paid, distortion models may not cover every lens profile
Best for: Editors cutting wide-angle or drone footage who need better lens correction than Premiere’s built-in tools
Pricing: Pay-what-you-want (free is valid)
6. Vizual PixelPerfect
![]()
Upscaling pixel art in Premiere Pro using standard interpolation methods produces blurry, smeared results that destroy the crisp pixel edges that define the aesthetic. PixelPerfect uses nearest-neighbor scaling instead, which preserves hard pixel boundaries when you scale 8-bit or 16-bit pixel art footage up to any resolution.
This is a niche tool but an essential one for a specific type of project: retro game montages, motion graphics using pixel art assets, title sequences with pixelated typography, or any project where low-resolution source material needs to scale up cleanly without anti-aliasing. It applies as a standard Premiere effect, requires no activation, and costs nothing at all.
Outside of pixel art contexts, it has limited practical use since nearest-neighbor scaling is not appropriate for photographic or cinematic footage. But within its specific domain, it is the only tool that does this correctly inside Premiere. If you are cutting a gaming channel or producing retro-styled content, this is one of those installs you make once and forget about until you need it, at which point it becomes indispensable. It is completely free with no paid tier and is part of the Vizual plugin family on aescripts.
Key features:
- Nearest-neighbor upscaling for pixel art footage
- Preserves hard pixel edges at any resolution
- Applies as a standard Premiere effect
- No activation or license required
- Part of the Vizual plugin family
Pros/Cons:
- Pros: Completely free, solves the pixel art upscaling problem correctly, no setup friction
- Cons: Only relevant for pixel art workflows, not a general-purpose upscaler
Best for: Editors working with retro game footage, pixel art assets, or pixelated motion graphics
Pricing: Fully free, no tiers or subscription required
7. True Exif
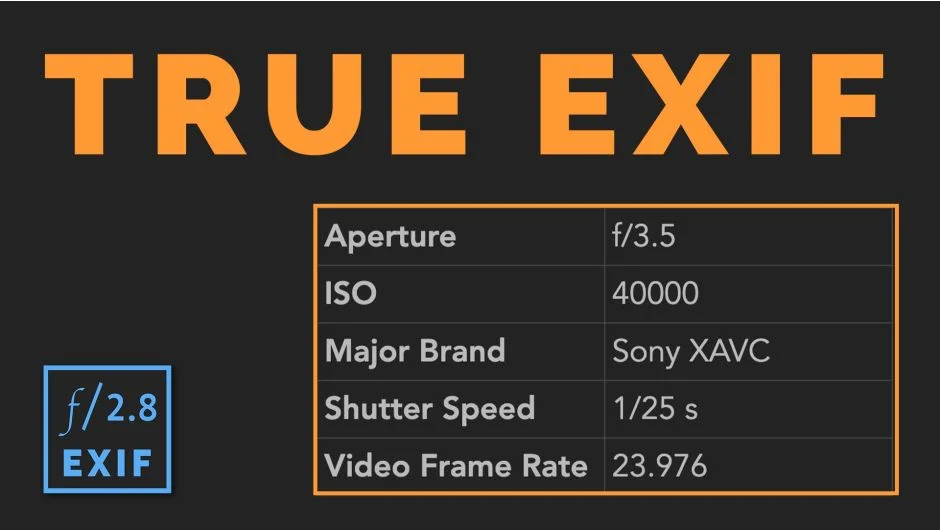
Premiere Pro surfaces basic clip metadata in the Project panel, but camera-specific EXIF data like focal length, aperture, ISO, shutter speed, and GPS coordinates is not exposed anywhere in the standard interface. If you are cutting documentary footage, corporate video with multiple camera operators, or any project where you need to track what was shot with what settings, this information is invisible by default.
True Exif fixes that. It reads EXIF metadata directly from your source files and displays it in a panel inside Premiere, and you can copy values out for use in reports, edit logs, or documentation. It is fully free with no trial or activation required, which makes it easy to keep installed as a background utility that earns its place the moment you actually need it.
The practical use cases are narrower than a general workflow tool, but within those cases it fills a real gap. Event videographers tracking multi-camera setups, editors producing behind-the-scenes documentation, or anyone handing off metadata-dependent deliverables will find this immediately useful. It does not modify or embed metadata back into files, so it is read-only by design, which keeps it safe to use without risk of touching source files.
Key features:
- Reads camera EXIF metadata from video source files
- Displays focal length, aperture, ISO, shutter speed, GPS, and more
- Panel-based display inside Premiere Pro
- Copy metadata values for external use
- Fully free, no activation required
Pros/Cons:
- Pros: Completely free, surfaces data Premiere hides by default, read-only so source files are safe
- Cons: Read-only, niche use case, not useful for every project type
Best for: Documentary editors, event videographers, and anyone who needs camera metadata visible inside Premiere
Pricing: Fully free, no tiers or subscription required
8. Influx
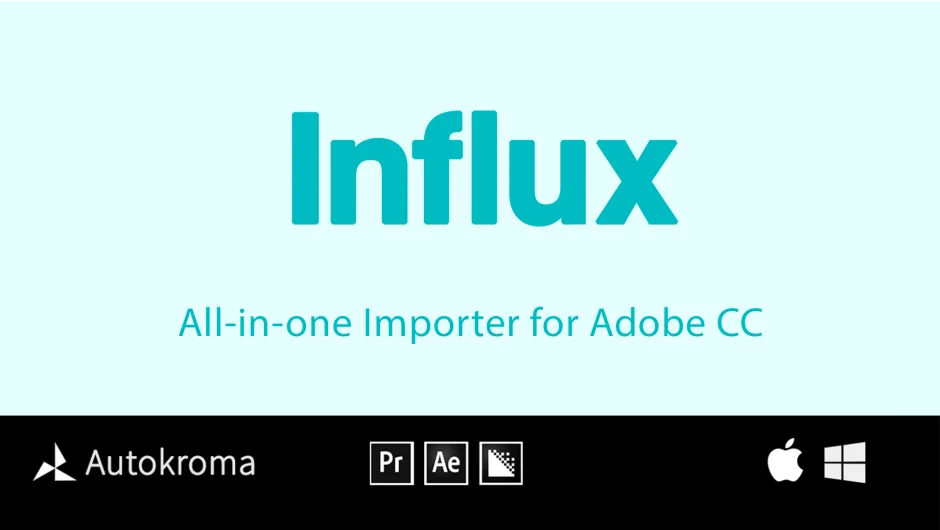
Premiere Pro’s native format support is broad but not complete. MKV containers, AV1 video, FLAC audio, and several other formats common in game capture, consumer video, and archival contexts either fail to import or require transcoding before you can work with them. Transcoding costs time and storage, and for long-form projects it adds up fast.
Influx extends Premiere’s native import support to cover these formats without transcoding. You import the file directly, it appears in your project panel, and you edit it like any other clip. The pay-what-you-want pricing model allows you to download and use it free, making it a zero-cost solution to a compatibility problem that otherwise requires third-party software or format conversion pipelines.
For editors cutting content sourced from PC gaming, screen recordings, archival footage, or material delivered by clients in non-standard formats, Influx is one of the more practically useful free installs on this list. The /plugins/influx page lists the full set of supported formats and current compatibility notes. One thing to verify: AV1 support specifically requires a compatible GPU decoder on your machine, so if you are on older hardware, test with a sample file before relying on it in production.
Key features:
- Native import for MKV, AV1, FLAC, and other non-standard formats
- No transcoding required
- Clips appear and behave like native Premiere media
- Pay-what-you-want, $0 accepted
- Regularly updated format support list
Pros/Cons:
- Pros: Solves a real format gap without transcoding, free at current pricing, saves storage on large projects
- Cons: AV1 support requires compatible GPU hardware, pay-what-you-want model may shift over time
Best for: Editors regularly importing game capture, archival footage, or client files in MKV or other non-native formats
Pricing: Pay-what-you-want (free is valid), suggested price available on the aescripts listing
9. Premiere Composer
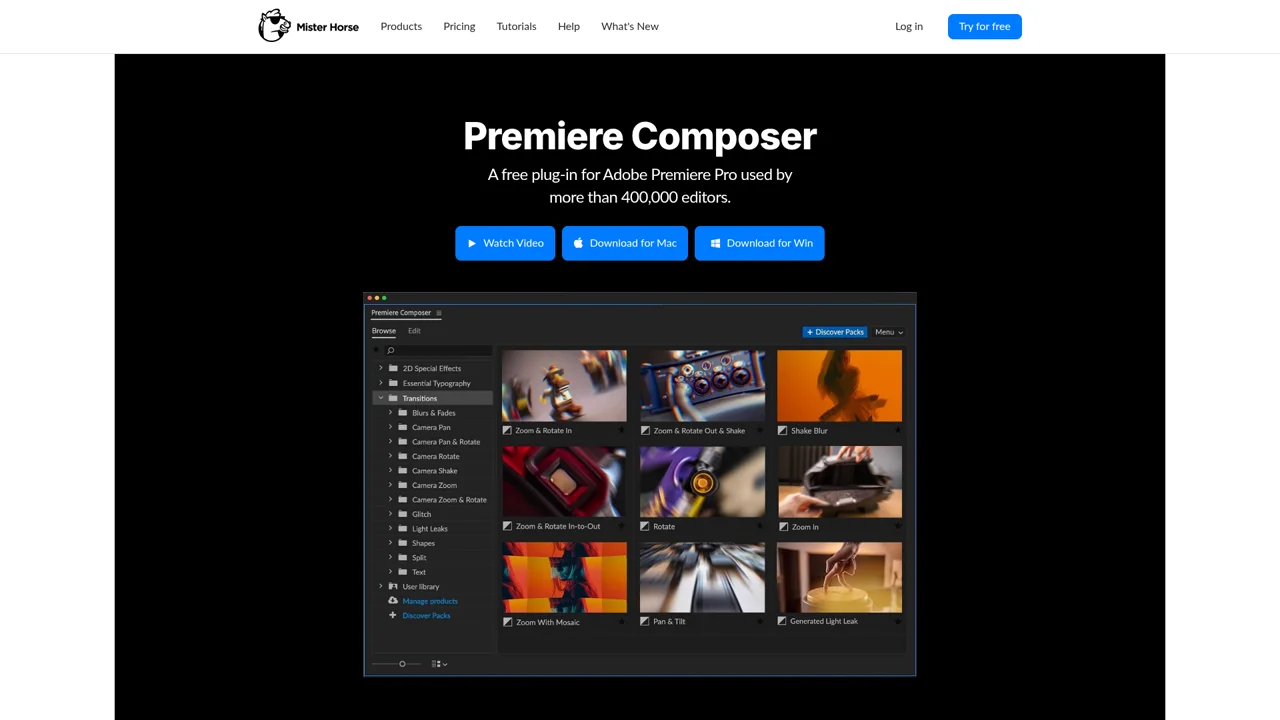
Premiere Composer from Mister Horse is the closest thing to a free motion graphics toolkit for Premiere Pro. The free starter pack includes transitions, text animations, and sound effects that apply directly inside the timeline, with each asset designed to match Premiere’s clip timing automatically rather than requiring manual keyframe adjustment.
The free tier is called a starter pack rather than a trial, meaning there is no expiration date. Sound effects are bundled with transitions and can be toggled off independently, and pitch adjustment is available per clip. Text boxes auto-scale to content length. For editors producing YouTube videos, social content, or any fast-turnaround work where polished transitions and lower thirds matter, this covers the baseline without requiring any After Effects knowledge.
The broader Mister Horse ecosystem includes paid asset packs for Premiere Composer, so the free tier is partly a gateway to additional purchases. That said, the included assets are production-quality rather than watered-down samples. The limitation is volume: if your style relies heavily on motion graphics variety, you will exhaust the free starter pack faster than you might expect and find yourself looking at the paid packs. But as a starting point, it is one of the stronger free options for editors who want polished output without building assets from scratch.
Key features:
- Transitions, text animations, and sound effects in a single panel
- Auto-scales to timeline clip timing
- Toggleable sound effects with pitch control per clip
- Auto-scaling text boxes for lower thirds
- Free starter pack with no expiration
Pros/Cons:
- Pros: No expiration on free tier, production-quality assets, sound effects included, no After Effects required
- Cons: Free selection is limited in volume, broader variety requires paid packs, functions as an entry point to the paid Mister Horse ecosystem
Best for: Editors who want polished transitions and lower thirds without any After Effects dependency
Pricing: Free starter pack (no trial, no expiration)
How we evaluated these plugins
Every plugin on this list was evaluated against the same criteria before inclusion. Compatibility with Premiere Pro 2026 was the baseline requirement: any tool flagged as deprecated or incompatible with current versions was excluded, regardless of how useful it was historically.
Pricing transparency was critical for a free-focused list. We verified that each tool is genuinely accessible at no cost, whether that means a fully free product, a pay-what-you-want model that accepts $0, or a free tier without watermarks or time limits. Tools that are technically free but require creating an account, entering payment details, or completing other friction steps beyond a basic download were noted as such.
Beyond cost and compatibility, we evaluated each tool on a specific workflow problem it solves. Broad tools scored well when the free tier was genuinely functional rather than a stripped teaser. Niche tools scored well when they addressed a real gap that Premiere Pro’s native toolset does not cover. Performance impact and update frequency were also factored in, since a free plugin that crashes on current hardware or has not been updated in three years is not a useful recommendation.
What to look for in free Premiere Pro plugins
The first thing to verify is Premiere version compatibility. Plugin developers do not always update their tools when Adobe ships major releases, and a plugin that worked in Premiere Pro 2024 may throw errors or simply fail to install in 2026. Check the developer’s documentation or the aescripts compatibility notes before downloading, especially for older tools.
Pay-what-you-want pricing is genuinely free in practice, but it is worth understanding that these models can change. If a tool you rely on shifts from pay-what-you-want to paid-only in a future update, you may need to purchase to continue using it. This is not a reason to avoid these tools, but it is worth downloading and archiving the installer if you plan to use a tool long-term.
For asset-based tools like template packs and transition libraries, consider how the assets are delivered. Tools that apply effects through Premiere’s native effects architecture behave more predictably across project types than tools that rely on external panel dependencies. If a panel fails to launch, you lose access to everything it manages. Tools like Transition Master 2 Basic that install directly into the effects panel avoid this failure mode entirely.
Support quality varies significantly in the free tier. Fully free tools on aescripts tend to have active community threads where common issues are documented, but response times from developers on free products are naturally slower than on paid ones. Before committing to a free tool for a client project, test it on a dummy timeline first and confirm that your specific OS and hardware configuration works without issues.
Finally, check whether the free tool is a standalone product or a gateway into a paid ecosystem. Both are legitimate, but they serve different purposes. A standalone free tool like UnMult stays free and functional indefinitely. A free starter pack like Premiere Composer is genuinely useful but designed to introduce you to a broader paid library. Knowing which type you are working with helps you plan your toolkit accordingly.
Frequently Asked Questions
Are free Premiere Pro plugins safe to install?
Plugins from established sources like aescripts.com go through a vetting process before listing. The tools on this list are from known developers with documented track records. The main risk with any plugin is compatibility: always verify your Premiere version is supported before installing, and test on a non-critical project first. Avoid downloading plugins from random file-sharing sites regardless of price.
Do free Premiere Pro plugins work on both Mac and Windows?
Most do, but not all. Compatibility varies by plugin and sometimes by OS version within a platform. Each tool’s aescripts listing specifies supported operating systems. As a general rule, verify macOS and Windows support independently, since some plugins that work on Intel Macs may have issues on Apple Silicon, particularly older titles that have not been updated for ARM.
Will free plugins slow down my Premiere Pro project?
It depends entirely on the plugin. GPU-accelerated effects have minimal impact on timeline performance. CPU-intensive effects applied to multiple clips across a long timeline can cause real slowdowns, especially on older hardware. The best practice is to apply effects judiciously rather than stacking multiple third-party plugins on the same clip, and to use proxy workflows for heavy effects during the edit.
Can I use free plugins for commercial client work?
Generally yes, but check the license terms for each individual tool. Most aescripts plugins explicitly permit commercial use. Pay-what-you-want tools sometimes distinguish between personal and commercial use in their terms, with commercial use technically requiring a payment even if the amount is $0.01. Read the license documentation rather than assuming.
What is the difference between a free plugin and a free trial?
A free trial has a time limit or feature restriction that expires. A genuinely free plugin has no expiration and no feature wall. On this list, tools labeled pay-what-you-want with $0 accepted are genuinely free to use indefinitely. Tools like the Premiere Composer starter pack are free by design rather than by trial. The best Premiere Pro plugins for beginners collection covers both free and low-cost options if your budget allows some flexibility.
Do I need to know how to code to use Premiere Pro plugins?
No. Every plugin on this list installs and operates without any scripting or coding knowledge. Tools like QuickScript and automation-based plugins exist for editors who want to write their own scripts, but the tools covered here are interface-driven: you apply them as effects, drag assets to the timeline, or use docked panels with standard controls.
How do I install a Premiere Pro plugin from aescripts.com?
Most aescripts plugins install through the aescripts+aeplugins Manager application, which is a free download. You log in with your aescripts account, and the Manager handles installation and licensing automatically. Some plugins are simple drag-and-drop installs into Premiere’s plug-ins folder. Each product page specifies the installation method. After installation, restart Premiere Pro and check the Effects panel or Extensions menu depending on the plugin type.
Are there free plugins that add captions automatically in Premiere Pro?
Yes. Captioneer offers a free 14-day trial with full features, and Premiere Pro 2026 includes built-in speech-to-text for basic auto-captioning. For animated caption styles that go beyond what native tools produce, the caption and subtitle plugins for Premiere Pro collection covers the full range of options including free-tier and paid tools.
Conclusion
For editors starting from zero, Spotlight FX is the strongest free pick on this list because its free tier covers transitions, titles, and workflow tools in one install, and it scales into a paid library if your needs grow. For a more targeted install list, pair Transition Master 2 Basic for native transitions, Influx for format compatibility, and AEVIEWER 2 for media browsing, and you have a functional free toolkit that covers the gaps Premiere leaves open by default.
If you want to keep exploring beyond this list, the transition plugins for Premiere Pro and workflow and productivity plugins collections include both free and paid options organized by use case.